

Multiple navigation graphs (with bottom navigation bar)
Jetpack Navigation is great for handling all your basic app navigation needs. It provides a visual overview and type-safety for passing parameters among others!
It's great for taking care navigation in common navigation UI components, such as bottom navigation bars or drawers. Just make sure that screen IDs are matching the navigation UI IDs and you are done!
But what if you have your navigation graph with all your screens, but one screen contains a navigation UI (e.g. a bottom navigation bar)? This is a common scenario if you are having some part of the app where users are not required to be logged in, but you switch layout after they log in.
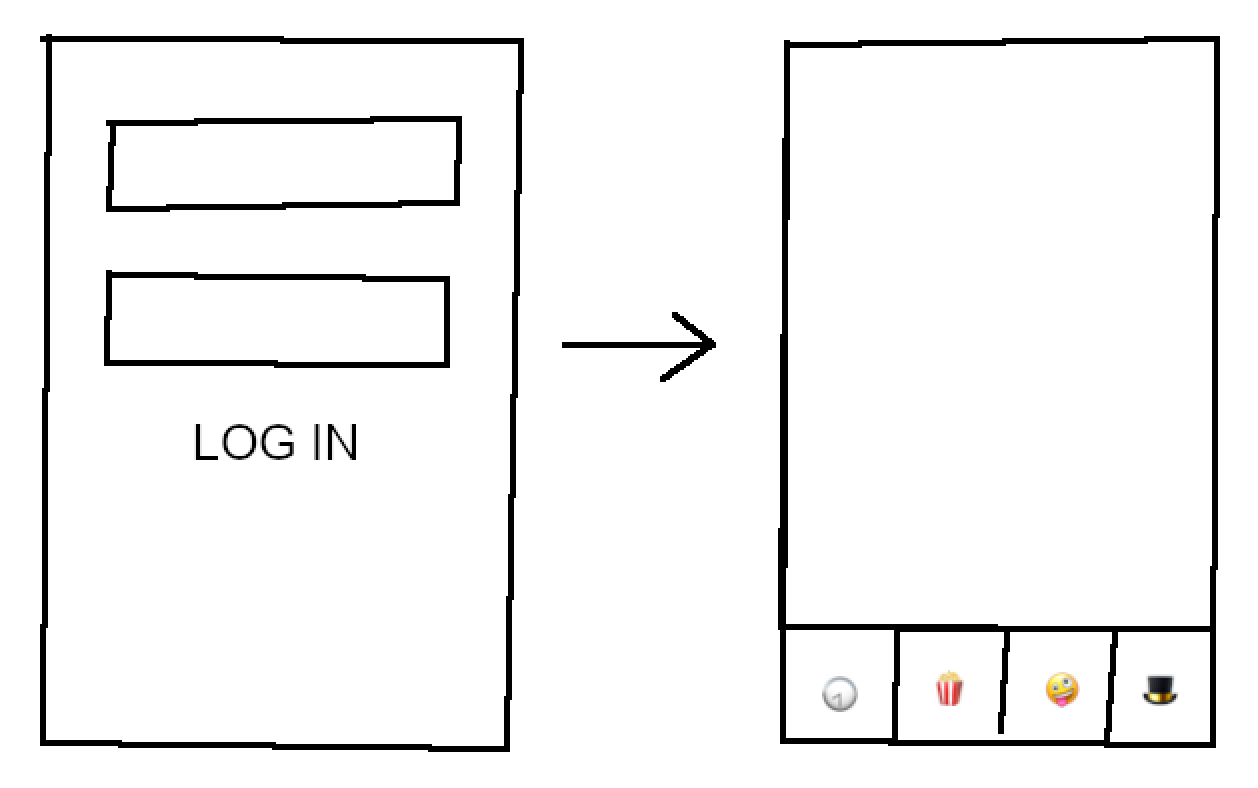
In this case, your single navigation graph is not enough. Multiple workarounds are possible, but the one I want to guide you through today is using multiple navigation graphs.
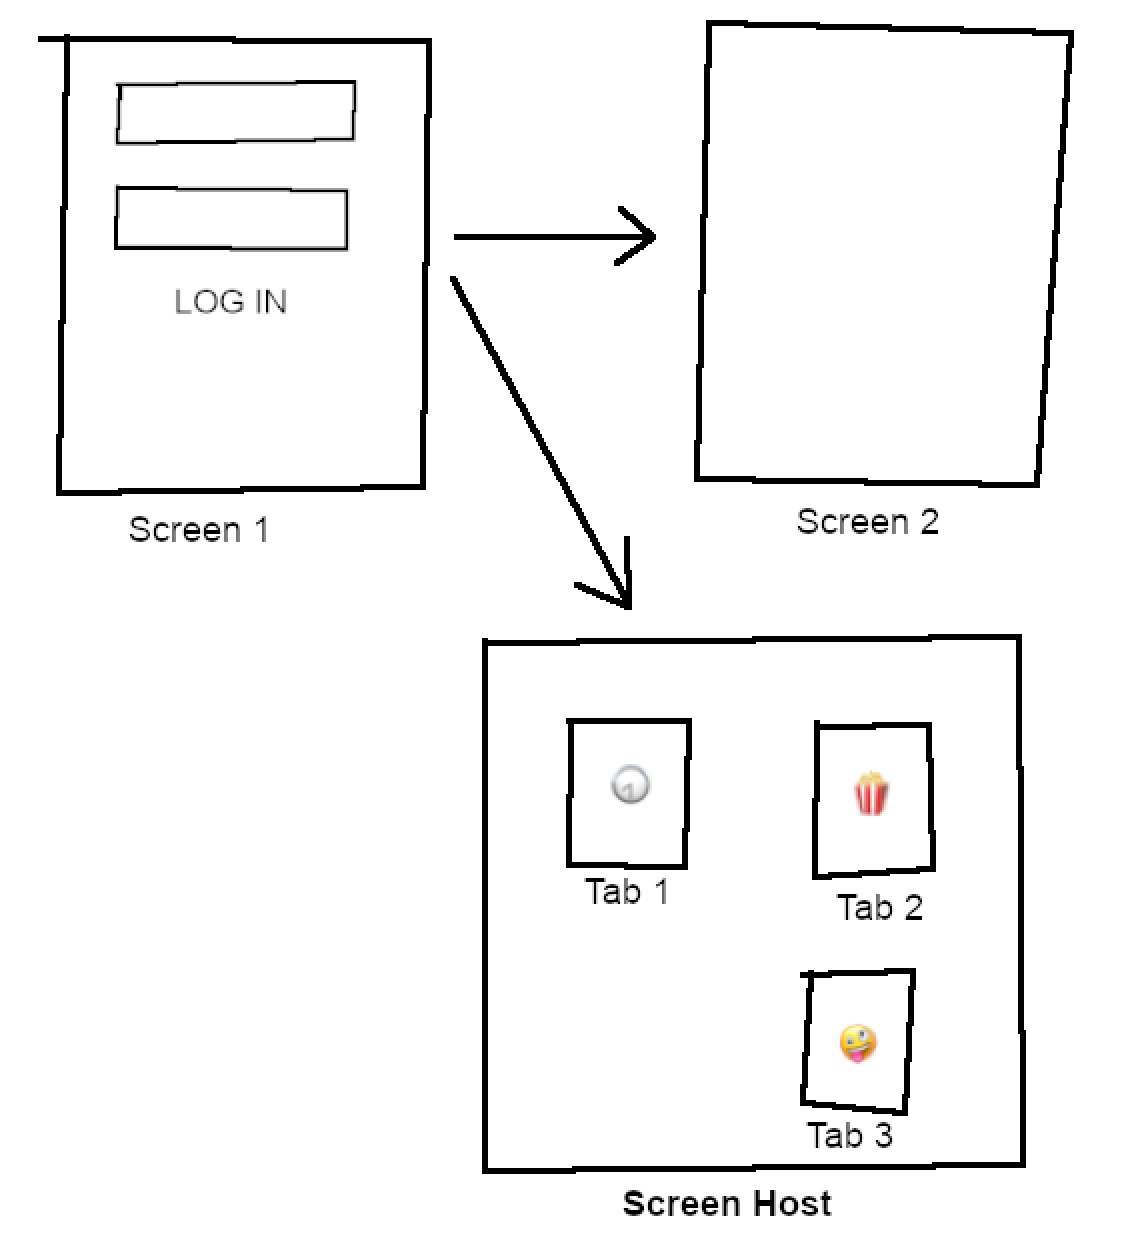
In this simplistic example, {Screen 1, Screen 2, Screen Host} should belong to the nav_logged_out navigation graph, and {Tab 1, Tab 2, Tab 3} to the nav_logged_in navigation graph.
Outer navigation graph (nav_logged_out)
This should be the navigation graph, that contains all the screens the user can navigate when it's logged out. The navigation host would usually be located in main_activity.xml and referencing the nav_logged_out.xml.
<FrameLayout xmlns:android="http://schemas.android.com/apk/res/android"
    xmlns:app="http://schemas.android.com/apk/res-auto"
    xmlns:tools="http://schemas.android.com/tools"
    android:layout_width="match_parent"
    android:layout_height="match_parent"
    tools:context=".MainActivity">

    <fragment
        android:id="@+id/navHostLoggedOutView"
        android:name="androidx.navigation.fragment.NavHostFragment"
        android:layout_width="match_parent"
        android:layout_height="match_parent"
        app:navGraph="@navigation/nav_logged_out" />
</FrameLayout>This is would be a normal navigation graph, that you can create following the official doc.
If the users are logged in, they should be navigated immediately to the Screen Host.
Inner navigation graph (nav_logged_in)
Screen Host should contain both the navigation UI (e.g. the bottom navigation bar) and the navigation host referencing nav_logged_in.xml.
<LinearLayout xmlns:android="http://schemas.android.com/apk/res/android"
    xmlns:app="http://schemas.android.com/apk/res-auto"
    xmlns:tools="http://schemas.android.com/tools"
    android:layout_width="match_parent"
    android:layout_height="match_parent"
    android:orientation="vertical"
    tools:context=".views.host.HostFragment">

    <fragment
        android:id="@+id/navHostLoggedInView"
        android:name="androidx.navigation.fragment.NavHostFragment"
        android:layout_width="match_parent"
        android:layout_height="0dp"
        android:layout_weight="1"
        app:navGraph="@navigation/nav_logged_in" />

    <com.google.android.material.bottomnavigation.BottomNavigationView
        android:id="@+id/bottomBarView"
        android:layout_width="match_parent"
        android:layout_height="wrap_content"
        app:menu="@menu/host_bottom_bar_menu" />
</LinearLayout>nav_logged_in.xml should contain all the tabs for the bottom navigation bar. The screen ids defined in nav_logged_in.xml should be the same as in the bottom bar menu XML (host_bottom_bar_menu.xml in this example).
<navigation xmlns:android="http://schemas.android.com/apk/res/android"
    xmlns:app="http://schemas.android.com/apk/res-auto"
    xmlns:tools="http://schemas.android.com/tools"
    android:id="@+id/nav_logged_in"
    app:startDestination="@id/Tab1Fragment">
    <fragment
        android:id="@+id/Tab1Fragment"
        android:name="com.packagename.Tab1Fragment"
        tools:layout="@layout/fragment_tab_1" >
    </fragment>
[...]<menu xmlns:android="http://schemas.android.com/apk/res/android">
<item
android:id="@+id/Tab1Fragment"
android:enabled="true"
android:icon="@drawable/tab1"
android:title="Tab 1" />
[...]You can achieve automatic navigation to each tab by running the following "glue" code.
val navController=requireActivity().findNavController(R.id.navHostLoggedInView)
bottomBarView.setupWithNavController(navController)
Notice that we are not using just findNavController() that could return the first navigation host found (depending on where you would call it). We explicitly want the navHostLoggedInView for the bottom navigation bar.
More detailed explanation on how to make other navigation UIs (such as navigation drawer) work with Jetpack Navigation in the official doc.
Update the navigation chrome
When you have multiple navigation graphs, and you want the ActionBar to update accordingly, you would need to remember to call this each time you "switch" between navigation graphs.
setupActionBarWithNavController(MainActivity@this, navController())
navController() should return the appropriate NavController that corresponds to the nav_logged_in.xml or nav_logged_out.xml.
Finally, the ActionBar's Up button should be explicitly handled.
override fun onSupportNavigateUp(): Boolean {
    return navController().navigateUp() || super.onSupportNavigateUp()
}Again, more details in the official doc.
Have fun with navigation! Happy coding!